반응형
1. jiangmiao/auto-pairs 이란?
jiangmiao/auto-pairs plugin은 프로그램 언어 작성시 괄호를 자동으로 닫아주는 플러그인이다.
if문 또는 while, for, 배열 그리고 함수를 선언하거나 작성할 때 소괄호(), 중괄호 {}, 대괄호[] 등이 쓰인다.
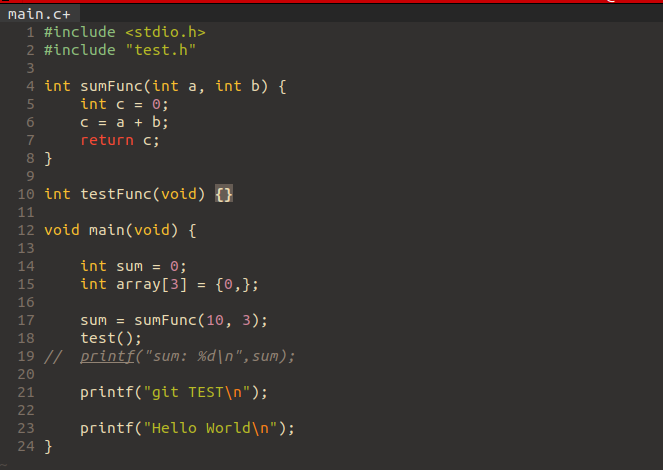
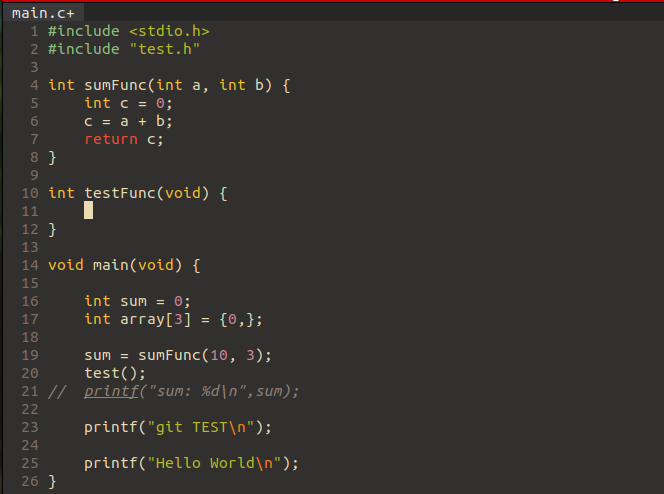
이 괄호를 열어주기만 하면 자동으로 닫아주는 괄호가 생기며, 커서는 괄호 안쪽으로 이동하게 된다.
2. .vimrc에 Plugin 추가
call vundle#begin()
" [] {} 등 괄호 입력시 자동으로 닫아주는 플러그인
Plugin 'jiangmiao/auto-pairs'
call vundle#end()
vundle#begin()과 vundle#end 사이에 jiangmiao/auto-pairs Plugin을 추가하고 :PluginInstall 명령어로 설치한다.
PluginInstall 명령어에 대해 잘 모르겠다면 아래 링크를 참조하길 바란다.
vim Plugin 사용방법
3. 설정
jiangmiao/auto-pairs plugin은 별도의 설정이 없다. 플러그인을 설치 후 바로 적용이 되어 사용 할 수 있다.
4. 현재까지의 설정이 적용된 .vimrc 내용
"-----------------------------------------------------------------------"
" Vundle 환경설정
"------------------------------------------------------------------------"
filetype off                   " required!
set shell=/bin/bash
set rtp+=~/.vim/bundle/Vundle.vim
call vundle#begin()
	" let Vundle manage Vundle
	" required!
	Plugin 'VundleVim/Vundle.vim'

	" vim 하단에 파일 정보 띄우기
	Plugin 'vim-airline/vim-airline'
	Plugin 'vim-airline/vim-airline-themes'

	"vim corlor/scheme 수정
	Plugin 'morhetz/gruvbox'

	" 파일 및 폴더 탐색
	Plugin 'ctrlpvim/ctrlp.vim'

	" vim 사용중 git 명령어 사용
	Plugin 'tpope/vim-fugitive'

	"vim 하단에 커서가 있는 함수나 변수의 정의 부분을 출력
	Plugin 'wesleyche/srcexpl'

	"명령어 자동완성 플러그인(inc + <C-a> : #include<>)
	Plugin 'SirVer/ultisnips'
	Plugin 'honza/vim-snippets'

	" [] {} 등 괄호 입력시 자동으로 닫아주는 플러그인
	Plugin 'jiangmiao/auto-pairs'


    " ...
call vundle#end()
filetype plugin indent on     " required!
	"
	" Brief help
	" :BundleList          - list configured bundles
	" :BundleInstall(!)    - install(update) bundles
	" :BundleSearch(!) foo - search(or refresh cache first) for foo
	" :BundleClean(!)      - confirm(or auto-approve) removal of unused bundles
	"
	" see :h vundle for more details or wiki for FAQ
	" NOTE: comments after Bundle command are not allowed..

"-----------------------------------------------------------------------"
"vim 환경설정
"-----------------------------------------------------------------------"

	" Vim 전용 기능 사용
	set nocompatible "Vim Using

	"파일 타입 설정
	set encoding=utf-8
	set fencs=utf-8,cp949,cp932,euc-jp,shift-jis,big5,ucs-2le,latin1

	" 명령어 기록 갯수
	set hi=1000

	" 백스페이스 사용
	set bs=indent,eol,start

	" 오른쪽 하단 커서 위치 항상 보이기
	set ru "same ruler

	" 줄번호 표시
	set nu

	" 줄 번호 표시 너비 설정
	set nuw=5

	" 탭 크기 설정
	set ts=4 "same tabstop
	set sw=4 "same shiftwidth
	set sts=0 "same softtabstop

	autocmd FileType make setlocal noexpandtab "Makefile은 tab 문법이기 때문에 스페이스 대체 안함.
	" 탭 >> 공백 변환 사용안함
	"set noet

	" 자동 줄바꿈 안함
	"set nowrap
	set linebreak
	set showbreak=+++\

	" 들여쓰기 설정
	set autoindent
	set cindent

	" 스마트 셋팅
	set smartcase
	set smarttab
	set smartindent

	" magic 기능 사용
	set magic

	" 이동 동작시 줄의 시작으로 자동 이동
	set sol

	" 비쥬얼 모드 동작 설정
	set sel=exclusive

	" 괄호짝 찾기에서 <> 도 찾도록 추가
	set mps+=<:>

	" 검색어 강조
	set hls

	" 검색시 파일 끝에서 되돌리기 안함
	set nows

	" 스마트한 대소문자 구별 기능 사용
	set scs

	"대소문자 구분(구분 없이 할 때 i 옵션 또는 ignorecase)
	set noignorecase

	" 항상 status 라인을 표시
	set ls=2

	"파일 형식에 따른 신택스 하이라이팅 켜기
	sy enable

	"괄호 매치
	set showmatch

	"마우스 자동
	set mouse=a

	"클립보드 복사
	"set clipboard=unnamed "use OS clipboard
	set clipboard=unnamedplus "use OS clipboard

	" 키워드 입력시 점진적 검색
	set incsearch
	set spell
"----------------------------------------------------------------------"
" AirLine
"----------------------------------------------------------------------"
set laststatus=2
let g:airline#extensions#tabline#enabled = 1 "버퍼 목록 켜기
let g:airline#extensions#tabline#left_sep = ' '
let g:airline#extensions#tabline#left_alt_sep = '|'
" 파일명만 출력
let g:airline#extensions#tabline#fnamemod = ':t'
let g:airline_highlighting_cache = 1

let g:airline_powerline_fonts = 1
let g:airline_theme= 'minimalist'
"let g:airline_section_y = ''
"let g:airline_section_warning= '' "마지막 status창 사용 안함
" 버퍼 목록 켜기
" 이 옵션은 버퍼를 수정한 직후 버퍼를 감춰지도록 한다.
" 이 방법으로 버퍼를 사용하려면 거의 필수다.
set hidden


"----------------------------------------------------------------------"
" gruvbox 설정
"----------------------------------------------------------------------"
set background=dark
let g:gruvbox_contrast_dark = 'soft'
"let g:gruvbox_contrast_light = 'soft'
"let g:gruvbox_transparent_bg = '1'
let g:gruvbox_italic = 1
"let g:gruvbox_underline=1
"let g:gruvbox_undercurl=1
"let g:gruvbox_termcolors=16
"let g:gruvbox_number_column='aqua'
"let g:gruvbox_sign_column='aqua'
"let g:gruvbox_color_column='aqua'

" Force to use underline for spell check results
augroup SpellUnderline
  autocmd!
  autocmd ColorScheme *
    \ highlight SpellBad
    \   cterm=Underline
    \   ctermfg=NONE
    \   ctermbg=NONE
    \   term=Reverse
    \   gui=Undercurl
    \   guisp=Red
  autocmd ColorScheme *
    \ highlight SpellCap
    \   cterm=Underline
    \   ctermfg=NONE
    \   ctermbg=NONE
    \   term=Reverse
    \   gui=Undercurl
    \   guisp=Red
  autocmd ColorScheme *
    \ highlight SpellLocal
    \   cterm=Underline
    \   ctermfg=NONE
    \   ctermbg=NONE
    \   term=Reverse
    \   gui=Undercurl
    \   guisp=Red
  autocmd ColorScheme *
    \ highlight SpellRare
    \   cterm=Underline
    \   ctermfg=NONE
    \   ctermbg=NONE
    \   term=Reverse
    \   gui=Undercurl
    \   guisp=Red
  augroup END
set termguicolors
colorscheme gruvbox


"----------------------------------------------------------------------"
" ctrlp.vim 설정(파일 탐색 속도 향상)
"----------------------------------------------------------------------"
set wildignore+=*/tmp/*,*.so,*.a,*.swp,*.zip,*.obj  " MacOSX/Linux
set wildignore+=*\\tmp\\*,*.swp,*.zip,*.exe  		" Windows

let g:ctrlp_custom_ignore = '\v[\/]\.(git|hg|svn)$'
let g:ctrlp_custom_ignore = {
  \ 'dir':  '\.git$\|public$\|log$\|tmp$\|vendor$',
  \ 'file': '\v\.(exe|so|dll|a)$',
  \ 'link': 'some_bad_symbolic_links'
\ }
let g:ctrlp_max_files = 10000
let g:ctrlp_max_depth = 30
let g:ctrlp_follow_symlinks = 1
"let g:ctrlp_user_command = ['.git', 'cd %s && git ls-files -co --exclude-standard']
"let g:ctrlp_use_readdir = 0
let g:ctrlp_root_markers = ['ctrlp-marker']

" <c-f>, <c-b> 모드 변환(MRU(Most Recently Used)내 검색, file 전체 검색, buffers내 검색)
" <c-d> path내 검색어가 포함되어 검색 또는 오직 파일내 검색어만 포함 검색
" <c-r> 정규 표현식 모드 전환(검색어와 완전히 일치한 파일만 보여 줌)
" <c-j>, <c-k> 검색결과내 커서 위아래 이동
" <c-t>, <c-v>, <c-x> 파일을 새로운 tab으로 열거나 창을 분활하여 파일을 염.
" <c-n>, <n-p> 검색 history의 next/previous 문자열 선택
" <c-z>, <c-o> 검색된 결과물에 <c-z>로 마크를 하고 <c-o>로 오픈(멀티마크 가능)
" <c-y> 검색입력어로 된 파일을 만든다. 파일 위치는 검색 폴더의 최상위 위치
" :help ctrlp-mappings 키 맵핑에 관한 설명


"-----------------------------------------------------------------------"
" Source Explorer 환경설정
"-----------------------------------------------------------------------"
nmap <F8> :SrcExplToggle<CR>            " F8 key = SrcExpl TOggle

let g:SrcExpl_winHeight = 12            " SrcExpl 윈도우 높이 지정
let g:SrcExpl_refreshTime = 100         " refreshing time = 100ms
let g:SrcExpl_jumpKey = "<ENTER>"       " 해당 definition으로 jump
let g:SrcExpl_gobackKey = "<SPACE>"     " back
let g:SrcExpl_pluginList = [
        \ "__Tag_List__",
        \ "_NERD_tree_",
        \ "Source_Explorer"
        \ ]

" // The color schemes used by Source Explorer. There are five color schemes
" // supported for now - Red, Cyan, Green, Yellow and Magenta. Source Explorer
" // will pick up one of them randomly when initialization.
let g:SrcExpl_colorSchemeList = [
        \ "Cyan",
    \ ]

" // Enable/Disable the local definition searching, and note that this is not
" // guaranteed to work, the Source Explorer doesn't check the syntax for now.
" // It only searches for a match with the keyword according to command 'gd'
let g:SrcExpl_searchLocalDef = 1

" // Workaround for Vim bug @https://goo.gl/TLPK4K as any plugins using autocmd for
" // BufReadPre might have conflicts with Source Explorer. e.g. YCM, Syntastic etc.
let g:SrcExpl_nestedAutoCmd = 1

" // Do not let the Source Explorer update the tags file when opening
let g:SrcExpl_isUpdateTags = 0

" // Use 'Exuberant Ctags' with '--sort=foldcase -R .' or '-L cscope.files' to
" // create/update the tags file
let g:SrcExpl_updateTagsCmd = "ctags --sort=foldcase -R ."

" // Set "<F12>" key for updating the tags file artificially
let g:SrcExpl_updateTagsKey = "<F12>"

" // Set "<F3>" key for displaying the previous definition in the jump list
let g:SrcExpl_prevDefKey = "<S-K>"

" // Set "<F4>" key for displaying the next definition in the jump list
let g:SrcExpl_nextDefKey = "<S-J>"


"-----------------------------------------------------------------------"
" ultisnips&vim-snippets Trigger Configuration
"-----------------------------------------------------------------------""
" Trigger configuration. You need to change this to something other than <tab>
" if you use one of the following:
" " - https://github.com/Valloric/YouCompleteMe
" " - https://github.com/nvim-lua/completion-nvim
let g:UltiSnipsExpandTrigger="<C-a>"
let g:UltiSnipsJumpForwardTrigger="<tab>"
let g:UltiSnipsJumpBackwardTrigger="<s-tab>"
" If you want :UltiSnipsEdit to split your window.
let g:UltiSnipsEditSplit="vertical"
" let g:UltiSnipsSnippetDirectories = ['~/.vim/UltiSnips']
5. 현재까지의 설정이 적용된 vim 코드 뷰


위 그림에서와 같이 시작 괄호를 입력하면 닫힘 괄호가 자동으로 생성되고 바로 원한는 값을 입력 하여 사용 할 수 있게 된다. 또한, 괄호 안 내용을 다 입력 하여 닫힘 괄호를 입력해도 중복 으로 입력 되지 않고 넘어가게 된다.
만약 괄호 생성을 하였다가 필요가 없어져 바로 생성한 괄호를 삭제 하게 되면 닫힘 괄호도 삭제 된다.
반응형
'Linux > VIM' 카테고리의 다른 글
| vim rg 사용법(vim 사용 여러 파일들 내 문자열 검색) (0) | 2023.04.06 |
|---|---|
| vim 파일 탐색 플러그인 fzf (0) | 2023.04.04 |
| VIM 코드 자동완성 플러그인 (0) | 2023.01.20 |
| wesleyche/srcexpl 설치 및 사용 방법 (0) | 2022.07.10 |
| VIM Plugin tpope/vim-fugitive 설치 및 사용 방법 (0) | 2022.05.11 |


댓글